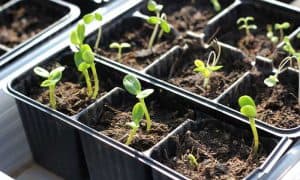
 Being able to tell when your seedlings are large enough to be transplanted is a great question to ask when it comes to learning about how to grow plants from seeds. Why? Simply because knowing when the proper time is to actually start planting them out in the garden is key to their successful development later on. If you move them even before they are ready, your seedlings may have a difficult time surviving the tricky elements outside. If you wait too long, they may become pot bound in their original containers. Perhaps the best way to find out if a plant is big enough to be transplanted is by looking at the number of their true leaves.
Your Step by Step Guide
- Count the true leaves. When you grow a plant from seeds, the very first leaves to emerge are the cotyledons which would look different from the rest of the leaves that will pop later. Its purpose is to provide stored food to the seedling for a limited period of time. True leaves will grow shortly after the cotyledons to generate adequate amount of energy (through photosynthesis) to help feed the plant for the rest of its life. The general rule of thumb is that you would know that your seedling is large enough to be planted out in the garden (after it has been hardened off) if it already has about three to four true leaves.
- Harden your plants off. When plants are grown from seed indoors, they often develop in a controlled environment where they are never or hardly ever exposed to the harsh environment outside. Hardening off is basically about introducing your seedlings to the great outdoors slowly in order to build up their defenses which in turn will help your baby plants deal with them. This usually involves packing your seedling in an open top box (for easy transport), placing the box (with your plant in it) outside in a sheltered and shaded area, leaving the box there for a few hours and then bringing it back indoors before the evening. This process has to be repeated over the next few days; leaving the box in that spot for a little bit longer each day. Once your seedling has finally been staying outdoors for the entire day, you can start moving the box to a sunny area and then repeating the same process for another few days until your plant is exposed to the sun all day.
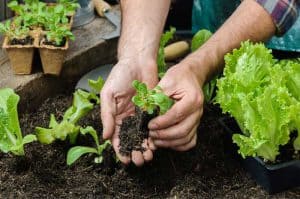
- Transplant the seedlings. Transferring your seedlings out in the garden can be done by following these steps:
- Make a small home in your garden for each seedling using a spade, hoe, or trowel. The hole should be deep enough so the transplant is exactly the same depth in the ground as it was still in the pot (except for tomatoes). Just make the hole two times wider as the root ball.
- Remove the seedling from its original container by turning it upside down then cupping the seedling with your hand. Make sure that you keep the soil and the root mass intact, and never yank it out by its stem.
- Check the root ball’s condition; unwind the larger roots and break the smaller ones. To help the plants get off to a fast and good start, don’t forget to mix some organic fertilizers into the soil of the planting hole.
- Place each prepared seedling into the holes that you have made and then start firming the soil around the roots using your hands. After this, create a moat around the seedling to hold water by forming a shallow soil basin around the transplant’s base.
- Depending on the conditions, remember to water the bed that same day or the next, and keep the bed moist while the seedlings start to grow strongly. Mulch once they are finally well-established.